Pages

Friday, February 21, 2014

Project Life: Weeks 4 and 5

Welcome back! Time for another installment of "Julie's Project Life".

haha. Yeah. OK...


Week 4:


I didn't have many pictures for this week so I did a one page layout.


Super simple title card that looks more difficult than it is. It's just a 4X6 card from Project Life's "Kraft" edition. I added a 3X4 card horizontally to put the camera sticker on. I just sewed around it. Then I put a leftover scrap of blue striped paper to put the week stickers on. The "5" is actually a blue sticker that I colored black. Added the date stamps and that's it.


I wanted to show you how easy it is to customize your cards for whatever your purpose. This striped paper is actually the back of the card I made for Reed's birthday party spread. HERE  I thought it would have been fine to use if only the stripe was red instead of orange. So I got out my red washi tape and cut it in half and covered the orange stripes. Easy.

Week 5:


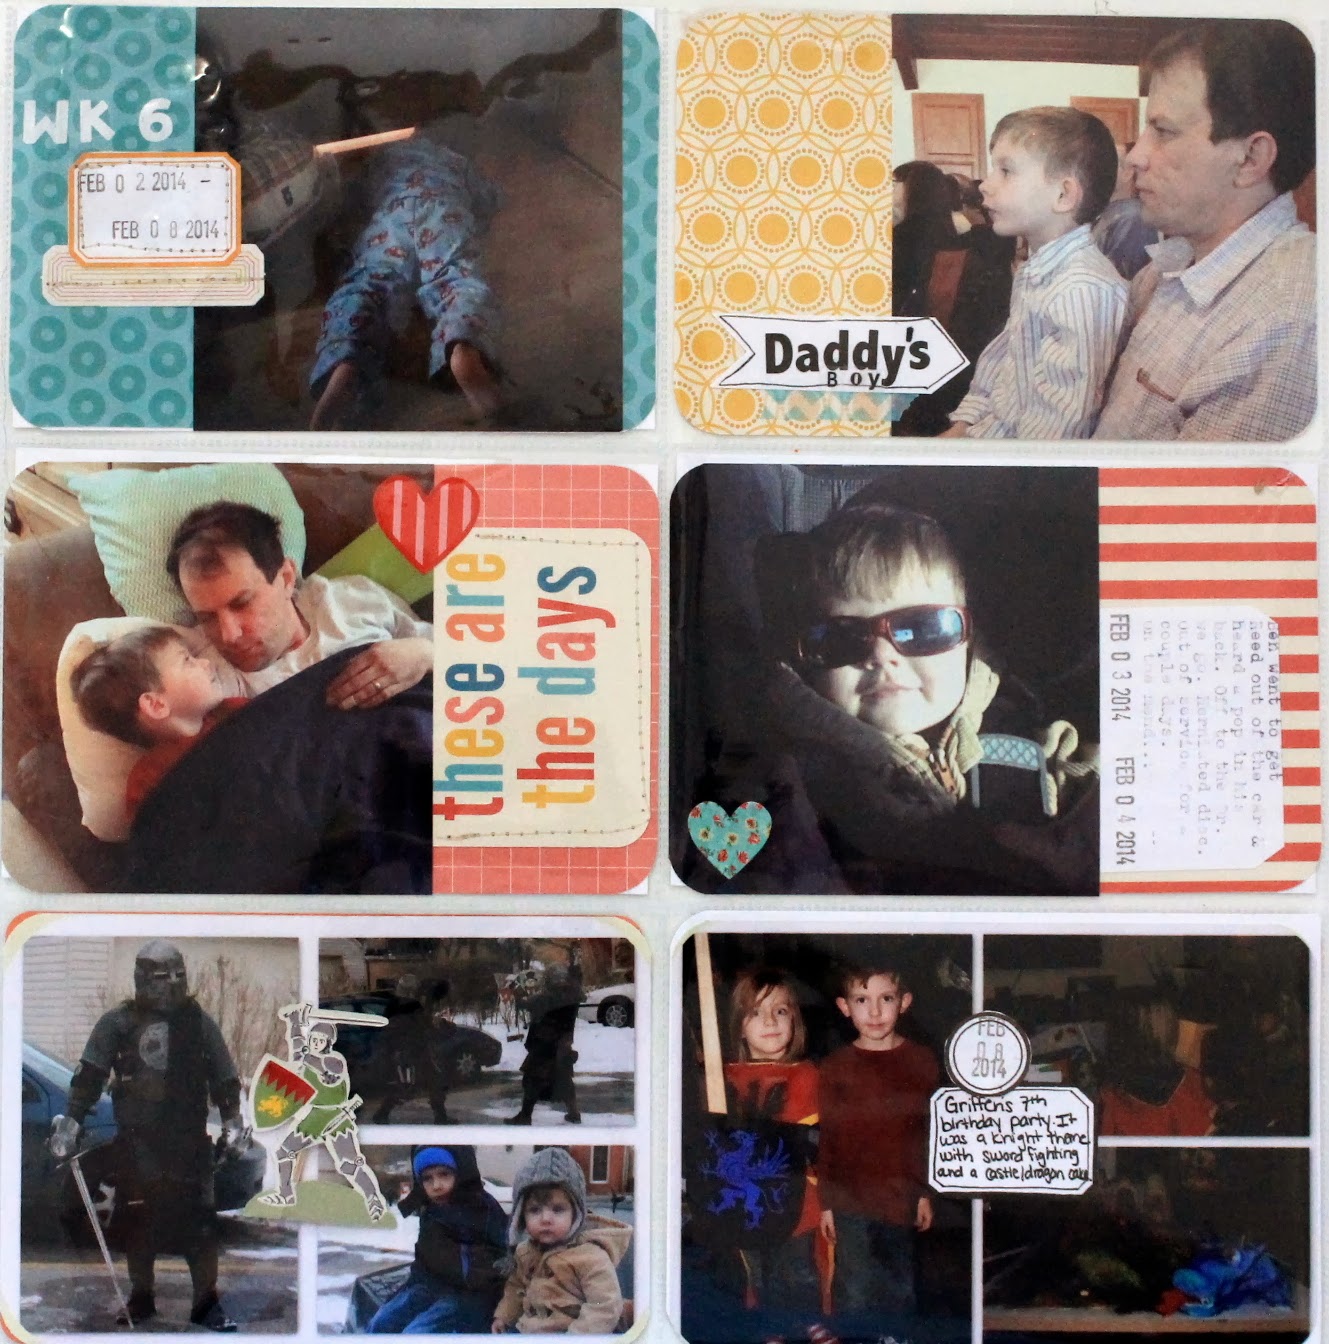
For this week I used only the "Kraft" edition again. 


This title card was actually a mistake. I had forgotten to leave a pocket open for a title so I just added some letter stickers and elements on top of this picture.


I turned a 3x4 card horizontal and tucked it under a picture and then sewed it down.


For this card I made a banner (Check out how I did that HERE) and just anchored it with a bit of teal washi tape.


The bottom 2 pockets are both picture collages I created so I could fit more pictures from my nephew's birthday party. I used this little knight that my SIL had in the take home treats. It was actually attached to a toothpick and so I just twisted it to get it to come off of it.


There you go! Weeks 4 & 5 are in the books, literally. :)


Thursday, February 13, 2014

Cleaning Out The Closet

Hi everyone! So in my last post about "declutterfication", I showed you how I cleared out our linen closet HERE. I mentioned that I tackled my own closet and now I have the pictures to prove it.

Here's the before:


Whoa Nelly. 

In the place we live I actually have my very own closet. It's kind of weird not having to share. (I guess that means I have no one to blame but myself for it to look like this....)

After:


At the top of the closet there are 2 really big shelves to use. I lined up all of my scrapbooks on one of them and then had room for my camera bag. On the second one I have 2 boxes of older photos and 2 canvas baskets that I've put tank tops and plain colored long sleeved shirts.

On the beautiful carpeted floor (that I can now see) I tucked a trunk that I had on one side that has out of season clothes in it. On the other side is a rolling cart with some extra scrapbooking goodies.

Again, some tips for this are the same for our linen closet. It actually didn't take me long once I went through the clothes. That's the hardest part for me. Actually I haven't even got rid of some of the clothes that I need to yet. I did a first pass through by just grabbing anything that I wouldn't wear. Either I didn't like it anymore,  or it had a stain or hole in it. I still haven't gone for the second pass through. That's the one wear I'm going to get rid of anything that doesn't fit. I haven't been able to get myself to do that because for some reason it is just too hard to do right now. Ugh 

So anyways, get those closets cleaned out! 

Work in progress I guess. :)


Tuesday, February 11, 2014

Project Life : Reed's Party

As I posted HERE, we celebrated my son's birthday about a week and a half ago. Here are the pages I made for the Project Life version of it. :)


Left side:


I tried to use the typewriter to type on this picture. It turned out OK. Not as dark as i was hoping though.


Right side:


I got the birthday printable HERE


Insert:


That's all for now! Have a good one :)


Linking up: Snap Creativity

Friday, February 7, 2014

Reed is Dino-Mite!

First and foremost, I can't even believe that my baby is 2 years old already. (Don't even get me started on my 6 year old) 

For Reed's party we decided to do a dinosaur theme because he really likes to play with the ones we have at home. Let's be honest, it's super cute when he roars too. :)

So I got to browsing Pinterest and found THEE CUTEST dinosaur tail I have ever seen. Then I found a super cute shirt I could do with Chase.  Now I'm not going to do a tutorial on these because there's no reason to. Here's the link for the Dinosaur Tail and Dinosaur Spiked Sweatshirt.

Now, I am the first to admit that sewing is not my strong point. I actually sew more on paper than I do on fabric. :) The hoodie was SUPER easy and the tail wasn't too bad. 

Here's how they turned out:


So cute right?!

I found these dinosaur hats at Dollar Tree of all places, and a lot of other little things for the treat bags and such.


I had these chalkboard labels from a couple years ago. I added them to cardstock and  wrote Herbivores and Carnivores next to the food.


We had Dino eggs (Grapes) and Dinosaur tails (Carrots and celery sticks) along with Dinosaur chicken nuggets. We also got a 3 foot sub.


I also had the boys' dinosaur toys and books around the tables for decoration. 

Here's a video of the night:


Thanks for stopping by!


Tuesday, February 4, 2014

Project Life Week 3

How is everyone on this beautifully cold, snowy morning? 

The best thing about these freezing cold days? More time for crafting. :)

Here's week 3:

(Left side)


For this week, I had enough pictures for a 2 page spread. 


Quick tip: if you don't have enough room for a title card, use one of your pictures instead! I just used some letter stickers to put the week number in the white space of my photo. I used a photo safe marker to add a somewhat straight square around it. I added a strip of paper to stamp the dates on and a piece of washi tape to ground it. So simple and easy.


I added a label sticker to add journaling to a picture and then cut out a tag out of cardstock to add journaling for another picture. For Christmas my husband bought me an old typewriter so I've been trying to use that more in my pages. I also am trying to add sewing more. 


For this pocket I used my visitor sticker from visiting my cousin in the hospital, and added a journaling card behind it. Of course I added a picture of their sweet baby with it.

(Right side)


This week I had some pictures of my youngest from hanging out at home and then my oldest was home sick one day. We've been having some crazy  weather here lately and so I took a screenshot of the wind gusts from our local TV station. 


This card is from We R Memory Keepers. I just added the date and  a small sticker. 


This little collage, I just used a label, some letter stickers and leftover piece of washi tape. 


That's all for today! This last weekend we had my youngest's birthday party so I'm starting to put together a post about all the fun and crafty things I incorporated into that. Stay tuned!


Tuesday, January 28, 2014

Project Life Weeks 1 and 2

It's that time again!  I wanted to just point out a couple things that I have decided to do different this year with my Project Life layouts. First, I'm going to try really hard to make a title card for every week. I started doing this last year but got bored with it so I would only do this once in a while. It's so much easier to keep track of when you have a title card for each week. Second, I'm going to try and use a corner rounder for every insert. For those of you that are die-hard Project Lifers, you know that the Becky Higgins Project Life cards/kits all have rounded corners and I thought I'd give it a try.


Week 1:


2 things about Week 1. I literally took only a couple pictures from January 1st - 4th. So I decided to have my first week be January 1st through the 11th. Even with all those days together I still had very few pictures, so I did a 1 page layout. 


Here's the title card. I found this "Hello January" picture on Pinterest HERE.


On this card I used a tag from my son's shirt to use as an accent.


I made this little collage using some accents from Heidi Swapp.


Week 2:


For this week's title card I made a 3X4 card because that's what I had room for. 


This little heart is from a collection from DCWV.  Not only does it have an adhesive back, but it also has a fabric texture to it. 


This camera is from the same collection. LOVE them!

So that's all for now. I have week 3 done, look for that later this week!


Tuesday, January 21, 2014

Linen Closet Declutterfication

Declutterfication. haha A new word I just made up....

Anyways...

  If you saw my title page for Project Life, I mentioned that my One Little Word for this year is REDUCE. I've decided that I'm going to use that in many different ways. Reduce clutter, reduce weight, reduce stress, reduce debt. I could go on and on.

 So I've been trying to get in the mood to declutter our place. The best way for me to do that is to start small. Find little places that I can quickly get done within an hour.

About 3 weeks ago I tackled my closet and I even took before and after pictures like a good blogger should do. :) BUT I took them with my cell phone and I have no idea how to get those photos onto my computer. LOL (So if anyone could help with that, just leave me a comment down below please :) )

This week I decided to go through our linen closet:

Here's the before:


I'm sure it has been worse, but I was tired of not being able to find anything!

Here's the after:


So much better, right?

So here's some tips that helped me:

1. Drag everything out that you possible can. It's going to look worse before it gets better.

2. I started with the actual linens first. Get all the sheets together and store kids sheets in a container so they're easy to find quickly. (Think middle of the night chaos.) The container I used for the crib sheets, I got at Dollar Tree. The wicker one I bought a Wal-mart MANY years ago. I have ALWAYS stored my sheets inside their own pillow case. I think my Grandma showed me that, I can't remember.

3. Sort through your towels. If there's any you don't want anymore (that are in good condition) donate to a women's shelter. If there are any that are not in great shape, donate to an animal's shelter. Fold the rest and line them up.  (I keep washcloths and hand towels in the bathroom)

4. I put our summer blanket and our son's summer quilt in one of those clear zipped up bags. I had some extra pillowcases that I put in the bag that our shower curtain came in.

5. I used one container to store extra bottled goods. Extra shampoo, hairspray etc. then a smaller one (blue box from Dollar Tree) for extra razors, deodorant, toothpaste etc. I also keep a huge zip-lock bag for trial sized things.(I used it when I had my youngest at the hospital.)


So that's what I've been up to! Have you been getting the new year itch?